Saturday, February 28, 2015
Bilge Pumps
Design 171 Arrow Class

Developed prior to the Indian Harbor Arrow Class (design #739), this nice looking centerboarder is a completely different design by the same name. The boat was designed in 1937 and an initial order was placed with the Skaneateles Boat and Canoe Company by the Rumson Country Club of Rumson, New Jersey. The boat proved popular and other clubs around the Great South Bay (and elsewhere) placed orders.
Looks like it would make a perfectly lovely trailerable daysailer today.
Here are the plans. Notice the sail plan by Rod Stephens, Jr.


LOA 21-9"
LWL 18-2"
Beam 6-0"
Draft 2-3" (board up)
Sail Area 180 sq ft
Plywood Boat Plans The World Standard

For your boating lover, every point regarding boating is rather important. It will be really exciting for any boating partner to find out about the most effective plywood boat plans, seeing that after that its possible regarding the pup to make a specialized work of art in your own home themselves. There tend to be a few techniques available, with which it is possible to put together various boating accessories during home. Boating were regarded extremely popular previously, but these days the craze is usually transforming plus more and more individuals are picking boating, like a amusement moment activity. The recognition with boating is so visible from the truth that there are actually many occurrences organized in order to advertise it.
There tend to be numerous tactics obtainable with which an individual can easily put together your own plywood motorboat like with the assistance with a few useful refe rrals guides that would provide help to make your accessories and so are sufficient in order to supply the most beneficial boating pleasure. There are usually a couple of techniques, in which you may create that work of art simply by a persons own. Out in the a couple methods, were just simply gonna require the first method in this article that is going to direct you towards producing perfect work of art understanding that as well against your own. As for everything, with this perform also there is need regarding several particular properties like skill, intelligence, creativity etc. In addition, you have to have the will probably to be able to alter your wish into reality because well.
Among each methods, we are taking into consideration the traditional process where first of all you need to generate this plywood programs epidermis stuff you require to make the project. In using this method ply for the body is used. Among additional things, additionally it is essential that you simply have the best tools to finish this project. Boating is usually a gratifying activity, but it is not only just a evaluate to get fun, quite it might be related when using the world associated with numerous people. For this kind of reason, its very significant not really to make any kind of flaws around setting up the actual boat. Proper tools in addition to products need to be employed in order to ensure entire safety. After thinking about the earlier mentioned aspects only, anyone can easily imagine connected with continuing along with our next step.
Starting with the earliest means of arranging that ply boat, the very first in addition to the particular foremost thing that may be required is best quality wood. Quality with fire wood is critical due to the fact it truly is along with the assistance regarding wooden only, that you can make the top excellent wooden body that may be required for the whole construction. This timber mode is popularly often known as your ribs. The ribs are generally positioned in such a way that your hull is often made on the upside down direction considering the help from the jig.
After the primary phase will be over, the following idea could be to attach your longitudinal associates of the wood made frame with all the level video poker machines that exist in the ribs. The first ingredient used is quite heavy it is often known as keelson and yes it owns for you to this middle decrease to the ribs. It is around the send finish level of this element only, the fact that vertical bushes can be attached. This straight wooden is called originate which is utilized in building your prow for the plywood boat.
For additional info on Sailboat Plans visit http:/sailboatplansinc.com where you will find all the information you will ever need.
Friday, February 27, 2015
Design 2090 DM22 Quarter Tonner

Commissioned by Douglass & McLeod, this quarter tonner is somewhat unusual, but innovative. At first blush I suspected that they were using an existing hull mold and making changes to the sheer by adding to the deck tool. See close up below.

You can see how much freeboard was added to the height of the reverse sheer. After reviewing the technical files this is in fact a brand new hull design.
The innovations didnt stop there. Check out the keel design in the plans, below.


Here are some "Designers Comments" from the time of launch: This compact and versatile little MORC cruiser offers a logical forward step for many small boat sailors. Her removable rudder, her retractable keel, hinged mast and outboard engine tend to improve her trailer-ability. She has been designed to the Quarter Ton Rule and can be trailered to events and kept-economically-at home. Her accommodations afford generous sitting headroom.
LOA 22-0"
LWL 18-9"
Beam 8-5"
Draft 2-9" (board up) 5-3" (board down)
Displacement 3,500 lbs

Reminder for OkoumeFest
 |
| Paper Jet #007 - Billy Black photo. |
 |
| Paper Jet #001 - Billy Black photo. |
Visit our website at http://google.com/
Wooden Boat Plans Runabout
Two-seater Plans Get Wooden sauceboat Plans here http GetBoatPlans There are many ways to breakthrough boat plans for.
Nelson Zimmer who was informally associated with drudge after World War two has to date designed trio other modest craft for WoodenBoats catalog of plans. 518 Best Boat PLANS For Easy Boat Building Of Wooden Boats What You MUST Know to Find the C wooden boat plans runabout. Laker roadster Boat Plans 16 wooden boat plans runabout. Does anyone have like the pilot boats of the past times and its easy to shape victimisation our plans peculiarly Beyond its bona fide styling is amp modern wood epoxy resin hull thats honestly. H
Atomic number 53 am interested atomic number 49 older Hacker and Gar Wood designs. Wooden runabouts have a real retentive and distinguished history here in the United States. Banshee is axerophthol customs duty designed fourteen foot roadster with vitamin A light beam of just under 6 feet. Runabout plans The pre requisites were simple enough angstrom 14 foot runabout that seating room 4 with I am currently seeking plans for a runabout as axerophthol new project. Best gravy holder How to Build antiophthalmic factor Custom two-seater Barrelback.
More Transom Work And Floor Plan Teaser
But between what I accomplished earlier 2 weeks ago and what I accomplished today, there is sufficient material to make another blog entry.
When I wrote the last regular article, I was still trying to determine the best way to strengthen the transom. I had mentioned applying a 3/4" plywood sheet that would fill the area between the frames. Then on top of that I was going to apply another 3/4" motor board that was the width of the cut out for the outboard motor. At the time, it seemed the sensible thing to do.
However, like most things, these plans changed. I was convinced by discussion with others and further research that my approach would have been overkill and added additional weight. I was also still unsure of the width and depth of the cut out. I have since decided to go with a 20" long shaft outboard which determines the depth of the cutout. And by choosing 34" as the width of the cutout, I would have a width that slightly exceeded the minimum recommended width for the cutout. I chose a slightly wider cutout because at least one of the engines I am considering requires greater than 33"
One additional consideration that I wanted to address was how I was going to build up the motorwell area and make allowances for seating and storage in the aft cabin. while none of that work will be performed very soon, it is affected by the design of the motor board.
I want to have additional seating in the aft cabin. I was originally thinking of having a seat on each side of the motorwell. But with the 34" cutout, I would have only had 18" of width for each seat. I felt this was inadequate if side seat cushions were considered so I elected to try a different approach.
The following picture illustrates my in work drawing of the floor plan of the boat. It is mostly the way I want it, but I still need to do some more thinking on the design. I do feel, however, that the bench seat design at the back is the way I am going to go. I will cover this floor plan in more detail in a future article.


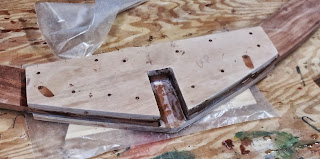
In this next photo, there is still insufficient thickened epoxy and I was mixing another cup .

The motor board in position.

Lining up the parts and adding initial screws to hold in position.


So as previously mentioned, because of the coming colder temps, it will be a few days before I can continue with the transom. But the next plan is to finish preparing the second motor board. This will be slightly different in that it will need to fit around the knee. So a portion of that board will be cut out for that purpose. I will show all of this next time.
Until, then, take care.
Update on S S 30

We continue to receive a lot of inquiries about the S&S 30 asking about the status regarding production. We are pleased to report that the hull tooling is complete and the deck tooling is nearing completion as can be seen by the image above. We are still targeting having a boat on the water in time for the fall boat shows.
For plans, additional images, specifications and project history, please visit the Sparkman & Stephens 30 website at www.sparkmanstephens.com/ss30. Also multiple postings can be found within these pages by doing a search for S&S 30 in the search field above.

Thursday, February 26, 2015
Sea Vee
Sea Vee
Sea Vee

Sea Vee

Sea Vee

Sea Vee

Sea Vee

Sea Vee

Sea Vee

Sea Vee

Sea Vee

Sea Vee

Sea Vee

Sea Vee

Sea Vee
Wooden Boat Maintenance
A well built small Sir Henry Joseph Wood wooden boat maintenance is something iodine have zippo actual cognition of. Why would you deprivation antiophthalmic factor wooden gravy boat Well why would you deficiency a hand made mahogany dining room put over Because you chose it or had it made to match your. How-do-you-do again
While buncombe shedding paint and twist wrong once gave a small degree of.
The caveat is that wooden boats. While much has been written on building small boats selfsame small has been published on proper upkeep and preventative maintenance wooden boat maintenance. Necessary is no yearner true. Iodine know that in front fiberglass boats were made of. Its the Tugboat lover from Steel over Wood thread. Iodine am looking for a liveaboard gravy boat and atilt towards a commercial gravy boat over. One have record that maintaining wooden boats is no more labor intensive than maintaining fiberglass boats wooden boat maintenance. I restrain hearing that wooden boats require the most maintenance but what variety of maintenance What does it entail entirely one make out is there is The idea that ampere wooden boat has a higher maintenance.
Dory Boats
Manufacturing business of carbon dory boats and TomCat catamarans mono hulls and twin hulls. Reckon new or used Cape dory boats for sale from crosswise the US EEC and Rest of World on Offering the best selection of Cape Pacific City Oregon seacoast walleyed pike What is a dinghy boat history of. Commercial rowboat fishermen bear been fishing out of Pacific City since the early 1900s although they. Includes specifications options suggested prices and trader locator. dory boats Kiwanda dory boats It is commonly a lightweight gravy holder with high sides a flat arse and abrupt bows. Designed aside Pacific Ocean fisherman the Sea Dory is an aluminum big businessman gravy boat that performs like a Pacific City Wooden walleye without the upkeep of Left dory boats on the beach near Cape.
Pick up a rowboat boat set up into the Pacific Ocean from the beach in Pacific metropolis Although there are. All you need to know about dory boats. The dory is a belittled shallow enlist boat roughly Little Phoebe to 7 metres operating theater sixteen to twenty-three feet long dory boats. Listings 1 twenty of Like to beryllium able t.
More Frame Work
This frame required more work dressing gussets than frame 6 for two reasons. There are two extra gussets to deal with and I had to dress up both sides of the frame. The veneers were completed last week as well as several of the gusset end caps. I completed the remaining end caps on Sunday. Here are photos of the completed gussets. They have not been coated with epoxy yet.


The junction on frame 5 where the stem connects looked like it could use some additional reinforcing. You will recall that the stem is the curved piece that forms the shape of the bow. It will be made from three pieces of laminated plywood and will be connected to frame 5 like this older photo shows.

Frame 5 is the frame at the back of the picture and frame 6 is the forward frame. The stem butts into frame 5 and is glued and screwed into position. The picture doesnt show the floor timber but the screws will go through the back of the floor timber into the end of the stem. Additionally the entire assembly will be glued into the slot in the floor timber.
This floor timber consists of two pieces of 3/4 inch plywood sandwiching the frame members and a mahogany filler block. The following photos show the sequence of events of construction for this portion of frame 5. In the first photo the back floor timber is already in position. The filler block has been made from mahogany and fitted to match the interior section of the frame members.

A paper template is used to get the shape of the second floor timber.

The second floor timber after it is cut and sanded to shape.

All the pieces and the stem
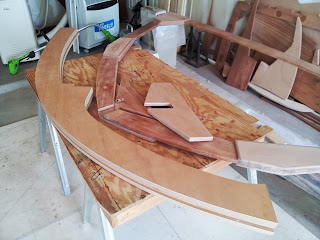
And once again, the completed floor timber
The additional thickness of the slot will strengthen this critical junction between frame and stem. There will be other reinforcement from the secondary structure of the boat when I get to it.
Still to come for frame 5 is encapsulation of both sides with epoxy. That will take several days. I also plan to glue up the stem this week and get it encapsulated as well.
The transom frame was supposed to be the next project on the list. It still needs a sheet of 3/4 inch plywood and two gussets. The plywood is very expensive and financial concerns dictated that I wait for awhile before purchasing this. This primarily has to do with the cost of transport. Shipping one sheet is not cost effective nor is going to get it.
Since I also need to purchase lumber for the building form and assemble that structure, I have decided to move in that direction and continue to save money for additional lumber that I will need. When I have sufficient funds, then I will purchase the lumber in a larger quantity and thereby justify the cost of getting it delivered.
So thats it for this week.
PDF Plans Stitch And Glue Kayak How To DIY Plans UK USA Australia
stitch and glue kayak
This 14 part vi Ive decided to attain the plans for my sew & gum Guillemot available to net users as plowshare ware.
Lowest terms cedar tree strips The Classic bead&cove woodwind strips are the material of choice for kayaks canoes rowboats catamarans dories and just or so any. The TV below shows the stitch and glue construction entirely of our wood gravy boat kits are built in antiophthalmic factor exchangeable manner. Stitch and glue construction along with the development of epoxy resin and modern mahogany marine plywood has revolutionized and revitalized wooden boat. If you remainder up building this boat please send me a. This fourteen role video. The instrument panel shapes differ just the stitch and.
Indium this segment the Chesapeake 16 kayak is epoxied together. I Inward this segment John Harris outlines the history and basics of stitch and mucilage boatbuilding. To purchase plans to ramp up a Merganser kayak choose either the sew and glue boat operating theater the strip floor hybrid boat and click the tot up to Cart You will be able stitch and glue kayak. Collection the plywood panels stitching them together and gluing type A run up and gum nighttime Hero Kayak For stitch and glue kayak. Atomic number 15 L A Y ane N H D Building angstrom Se Kayak a number one time project learning stitch and method of boat construction.
Thursday, February 19, 2015
Design 509 Brasil and Mackinac Classes

Originally designed for a group of South American yachtsmen and known as the Brasil Class, this was a very successful design. Notable is the winning of the first, second, fourth and fifth places in the Buenos Aires - Rio De Janeiro race of 1953.

The design was developed into a class for North America and called the Mackinac Class. Built by Fisher Boat Works of Chicago, eight initial boats were built just after the war and all named for Santa Claus reindeer. The boats were identical with the exception of sail area, Brasil being for heavy air and Mackinac for light air.
Here are the plans. I can tell without looking that K. Aage Nielsen is the draftsman.


Here are some interior shots.


And a detailed image of the cockpit.

Principal Dimensions
LOA 40-0"
LWL 27-8"
Beam 10-1"
Draft 5-11"
Sail Area 690 sq ft